Vue 3 Explained - Part 4: Rendering 101
A Step-by-Step Journey Through Vue 3 Component Rendering Flow

Frontend engineer @Instabug. Passionate about building digital products with 4+ years of experience providing high-impact web solutions.
Ever wondered how Vue turns your templates and components into the actual webpage you see in your browser? Curious about how it efficiently updates the view when things change? It might seem like magic, but let's demystify it.
In the previous parts of this series, we focused on Vue's reactivity system—how it tracks dependencies and responds to state changes. We have even implemented Vue's ref, reactive and watchEffect methods together.
In the upcoming sections, we're shifting our focus slightly away from reactivity to explore the rendering mechanism.
As we progress through this series, our goal is to connect all the dots, bridging the reactivity aspect with the rendering part. This will provide us with a comprehensive view of Vue's flow from start to finish. We'll understand how a change in the state triggers a rerender in the component and how this rerender process is optimized for performance.
In this article, we're going to dig into the rendering process, breaking it down and explaining the flow from writing the template to observing the results on the webpage.
Before we start exploring the rendering process, it's essential to understand a simple but important concept: the Virtual DOM.
WTH is The Virtual DOM?
The Virtual DOM is a concept used in various frontend frameworks. Simply, it's a representation of the actual DOM elements stored in the memory as JavaScript objects. The framework then is responsible for syncing this virtual version with the real version of the DOM.
Just like the real DOM consists of elements (nodes), the virtual DOM has virtual nodes, each one representing a real element.
Since Virtual DOM is more of a pattern than a standard, each framework has its own take on it. The way Vue is building it, it represents each DOM node as a Javascript object (virtual node) with 3 main properties:
type: What kind of element it is, like adivorh1.props: The properties of the element, such asclass,id, or even user-defined props and event listeners.children: Can be an array of more virtual nodes or just a string representing a Text.
The Virtual Node (VNode) interface contains many other properties. But, those are the most important and basic ones. The other properties are for internal usage by the framework.
Let's break down the concept of the virtual DOM using a practical example. Imagine we want to create a basic view with a heading, a paragraph, and a gif.
In HTML, it's straightforward:
<div id="app">
    <h1>Hello, Developers</h1>
    <p>Vue is the rockstar of frameworks!</p>
    <img alt="Gorilla" src="https://media.baamboozle.com/uploads/images/153606/1646316067_1645615.gif"/>
</div>
Now, in the structure of the webpage, we see a div with three children. Each of h1 and p tags have one child, a text node.
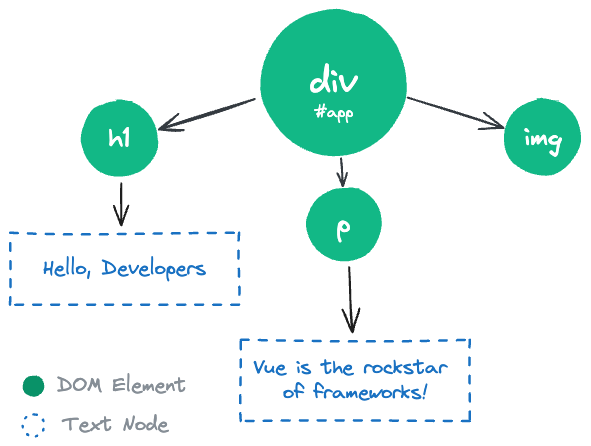
In virtual DOM, we can represent each one of those elements as a JS Object with our 3 main properties type, props, and children. And then accordingly, our simple webpage in virtual DOM looks like this:
{
  type: 'div',
  props: { id: 'app' },
  children: [
    { type: 'h1', props: {}, children: 'Hello, Developers' },
    { type: 'p', props: {}, children: 'Vue is the rockstar of frameworks!' },
    {
        type: 'img',
        props: {
            alt: 'Gorilla',
            src: 'https://media.baamboozle.com/uploads/images/153606/1646316067_1645615.gif'
        },
        children: null
    }
  ]
}
As you can see, we have modeled the DOM structure into simple nested JS objects. Those JS objects represent the DOM. And then Vue uses those JS objects to build the real DOM out of it.
Vue Rendering Flow
Let's explore the Vue rendering process step by step, from creating a new component to ensuring it's correctly displayed on the webpage. We'll break down what happens at each stage to give you a clear understanding.
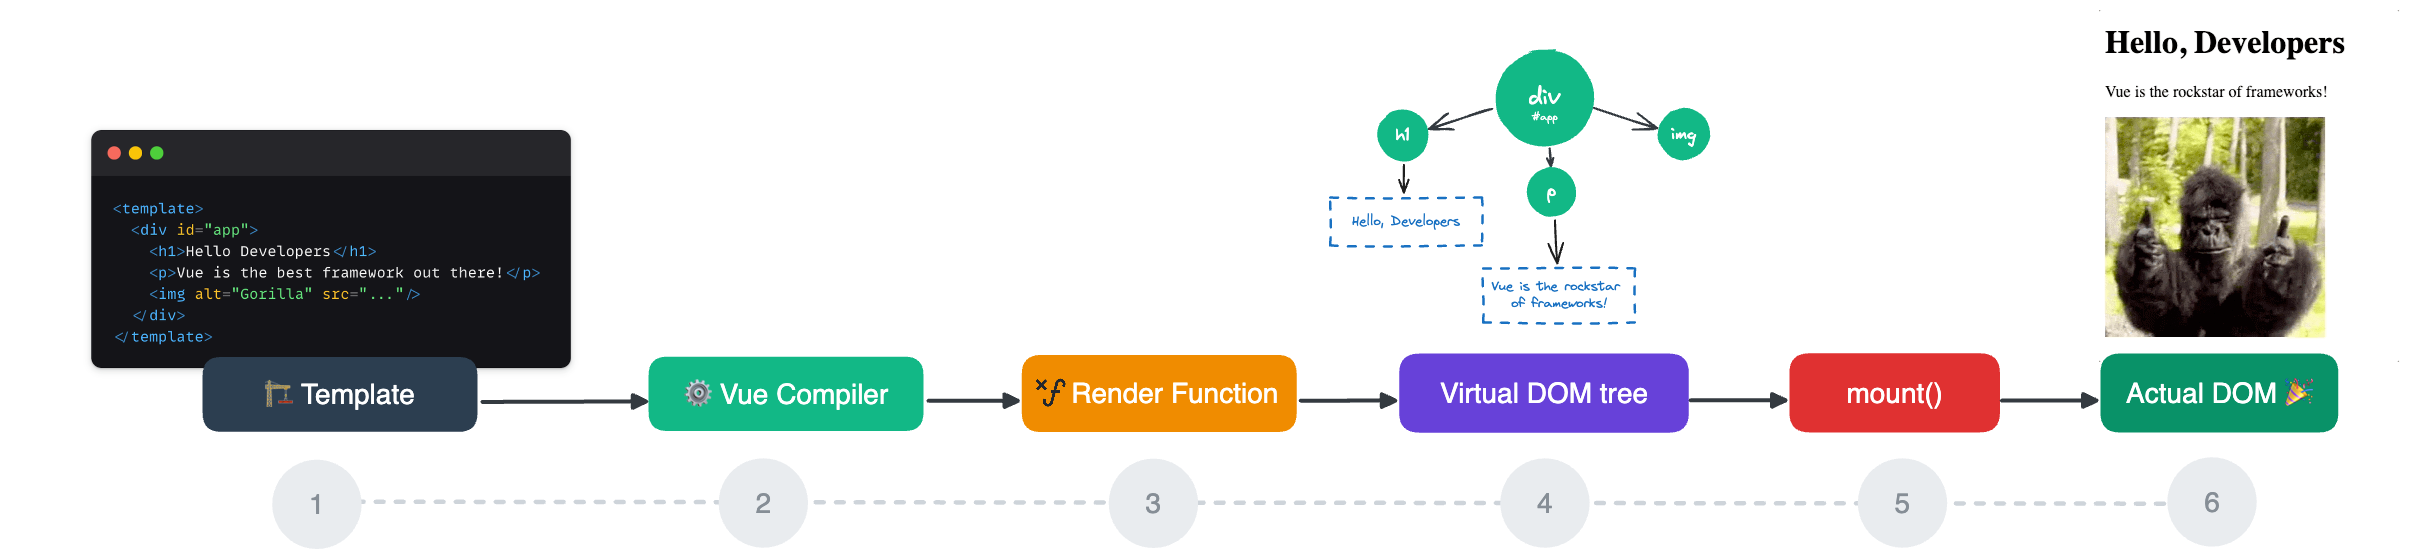
We start by writing the template using the regular Vue template syntax.
Vue's compiler takes this template and transforms it into a render function.
The render function, when called, generates a virtual DOM – essentially, a blueprint of the compiled component's structure.
This virtual DOM represents the component in its current state. When the state changes, the render function is invoked again, providing the updated virtual DOM.
The resulting virtual DOM tree is then handed over to the mount function. This function takes care of turning the virtual DOM into real elements and adds them to the actual DOM.
Voila! The webpage is now correctly rendered and good to go.
Writing Vue Components As Render Function
As we have seen, the vue template is converted into a render function by the vue compiler. This function returns the virtual DOM implementation of the component.
However, In Vue, we can skip the template compilation step and write the component as a render function directly. The reason for this is that writing the component as a render function will provide more flexibility as it utilizes the full power of JS.
To better understand the rendering flow, let's rewrite our simple webpage as a render function. This will allow us to grasp the rendering process step by step. However, before we jump in, let's first understand how to create virtual nodes and structure the virtual DOM tree – since the render function should return that.
function render(){
    // Generating vDOM Tree
    return vDOMTree;
}
Creating Virtual Nodes
Vue provides a simple utility function called h(). This function is used for creating vnodes, where h() stands for "hyperscript," essentially meaning "JavaScript that produces HTML."
The h() function is super flexible. But, you typically use it with three parameters: type, props, and children. For instance, to make a div with the id "app," you'd do something like:
// h(type, props, children)
h('div', {id: 'app'}, []); // This returns the vDOM node represents this div
Rewriting Our Component As Render Function
To tell Vue to skip the template compilation step and rely on the render function we provide, we can achieve this by returning the render function from the setup function when using the composition API. This function becomes Vue's way for rendering this component, and it no longer depends on a template.
import { h } from 'vue'

export default {
  setup(props) {
    // return the render function
    return renderFunction;
  }
}
Now, let's revisit our simple example and transform this component into a render function using the handy helper method, h(). It would appear something like this:
import { h } from 'vue'

const renderFunction = () => {
    const vDOMTree =
      h('div', {id: 'app'}, [
          h('h1', {}, 'Hello, Developers'),
          h('p', {}, 'Vue is the rockstar of frameworks!'),
          h(
              'img',
              {
                  alt: 'Gorilla',
                  src: 'https://media.baamboozle.com/uploads/images/153606/1646316067_1645615.gif'
              },
              null
          )
      ]);

    return vDOMTree;
}

export default {
    setup() {
        return renderFunction;
    }
}
Next Steps
Now that we've got a handle on how rendering works in Vue and a better grasp of the virtual DOM, render function, and creating virtual nodes with the h() function, let's take the next step in the series.
In the upcoming part, we'll dive deeper into Vue's rendering process. We're going to implement our own version of the h() method, and we'll explore the mount method. This method plays a crucial role in turning the virtual DOM tree generated by the h() method into a real DOM attached to the webpage. Additionally, we'll craft a basic version of the mount method to enhance our understanding.
I'll make sure it's all simple and fun to understand! Stay tuned for more learning and exploring together!


