Vue 3 Reactivity System Is Brilliant! Here’s How It Works - Part 1
Building reactivity engine basic blocks
What do we mean by reactivity?
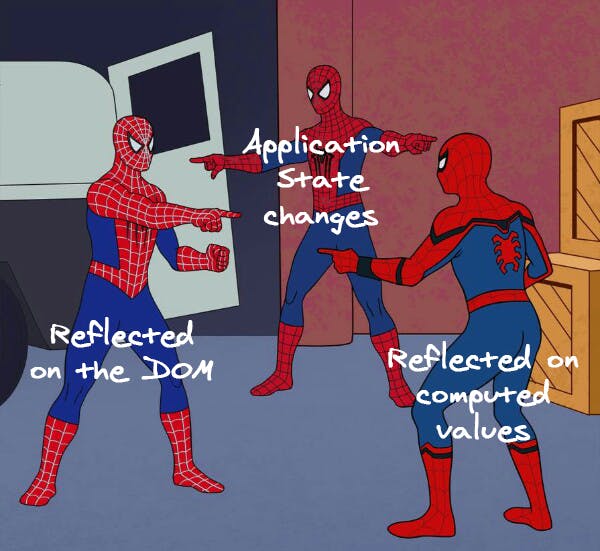
Being a frontend developer nowadays means that you’re dealing with reactivity on a daily basis. Basically, it is the seamless mapping between the application state and the DOM. Any change in the application state will instantly be reflected on the DOM without the need to handle this manually, just change the state and let the framework do the rest of the work for you.
Simply put, the framework is handling this “Oh! The price has changed, update the DOM with the new price and update any other variables that are depending on this price too.”
Reactivity Hello World! What Problem We’re Trying to Solve?
Let’s consider this example. We have a product that has a price and quantity. And there’s another variable totalPrice that is being computed from price and quantity.
let product = {price = 20, quantity: 5}
let totalPrice = product.price * product.quantity

console.log(totalPrice) // Returns 100
Now if we changed the price of the product, the total price doesn’t get updated.
product.price = 30
console.log(totalPrice) // Still returns 100
We need a way to say to our code “hey, totalPrice is depending on price and quantity. Whenever any of them changes recompute the totalPrice”.
Let’s tackle the problem step by step, each step will be built above the previous step until we build a whole reactivity engine at the end.
First of all, We can wrap the code that updates totalPrice into a function updateTotalPrice and call it whenever needed
function updateTotalPrice() {
    totalPrice = product.price * product.quantity
}

product.price = 30
updateTotalPrice()

console.log(totalPrice) // Now it returns 150
Now what we need to do is, call the updateTotalPrice function whenever the price or quantity changes. But, calling it manually after every update is NOT practical, we need a way to automatically know that the value has changed and therefore call the updateTotalPrice function automatically. And here is where Javascript Proxy comes into place.
Introducing Javascript Proxy
The
Proxyobject enables you to create a proxy for another object, which can intercept and redefine fundamental operations for that object. – MDN description for the proxy object
Simply, Javascript Proxy allows us to intercept the basic operations like getting a value or setting a value of an object. And applying whatever logic we need on each operation.
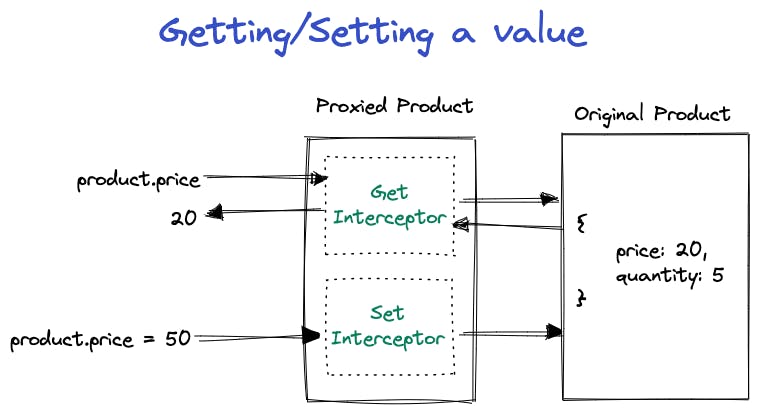
The proxy constructor takes 2 parameters:
- Target: Which is the original object that we need to Proxy
- Handler: An object that defines the intercepted operations and the logic that will be executed
Let’s start with a simple example: We’re going to create a proxy with an empty object handler, a proxy that is not doing anything. It will behave just like the original object.
let product = {price: 20, quantity: 5}
let proxiedProduct = new Proxy(product, {})

console.log(proxiedProduct.price) // Returns 20

proxiedProduct.price = 50
console.log(product.price) // Returns 50
Now let’s intercept the get and set functionalities and just add a console.log before getting or setting a value. This is done by implementing get and set functions in the handler object of the Proxy.
getfunction: It's a trap for the get operations on the object and takes 3 parameters:- target: The original object
- property: The property we're trying to get the value of
- receiver: The object that was called on, usually the proxied object itself or any inherited object (We're not going to use it anyways for now)
setfunction: It's a trap for the set operations on the object and it takes 4 parameters:- target: The original object
- property: The property we're trying to set the value to
- value: The value that we need to set
- receiver: Same as the
getfunction, not going to use it for now too
let product = {price: 20, quantity: 5}

let proxiedProduct = new Proxy(product, {
    get(target, property){
        console.log(`Getting value of ${property}`);
        return target[property]
    },

    set(target, property, value){
        console.log(`Setting value of ${property} to ${value}`);
        target[property] = value
        return true
    }
})

console.log(proxiedProduct.price)
// Prints "Getting value of price"
// Then, Returns 20

proxiedProduct.price = 50
// Prints "Setting value of price to 50"
// Then, Set value of product.price to 50
Can you see it now? 🤔 At first we were looking for a way to automatically detect that a property’s value has changed to call the updateTotalPrice function. Now, that we have what we were looking for we can simply use a Proxy with a setter to achieve that.
Back to Our Main Problem
Improvement 1: Calling updateTotalPrice function inside the setter
Last time we needed a way to say “Hey, whenever price or quantity changes call the updateTotalPrice function”. This seemed to be some sort of magic that we need to happen. Now that we have a way to automatically detect that a property has changed, it is not magic anymore. We can simply call the updateTotalPrice function inside our setter.
let proxiedProduct = new Proxy(product, {
    get(target, property){
        // Let's keep the getter empty for now
    },

    set(target, property, value){
        target[property] = value;

        if(property === "price") updateTotalPrice();
        if(property === "quantity") updateTotalPrice();

        return true;
    }
})
Now we have what we need. If we updated the price of the product, the totalPrice will be updated consequently.
console.log(totalPrice) // Returns 100

proxiedProduct.price = 30
console.log(totalPrice) //Returns 150 🎉
Just before leaving this point, we don’t need redundant calls for the update function. If the value of the price for example was 20 and we’re setting to a new value of 20 too. It doesn’t make sense to recalculate the totalPrice as it hasn’t changed. Therefore, we’re going to change the code a little bit
let proxiedProduct = new Proxy(product, {
    get(target, property){
        // Let's keep the getter empty for now
    },

    set(target, property, value){
        let oldValue = target[property];
        target[property] = value;

        // Call update function only if the value changed
        if( oldValue !== value ) {
            if(property === "price") updateTotalPrice();
            if(property === "quantity") updateTotalPrice();
        }

        return true;
    }
})
Improvement 2: Creating a Dependencies Store depsMap
In another scenario, we might have a function updatePriceAfterDiscount that depends only on the price and should be called when the price property changes. This is where our previous solution falls short, we need to modify our setter to handle this scenario too
if(property === "price"){
    updateTotalPrice();
    updatePriceAfterDiscount();
}

if(property === "quantity") updateTotalPrice();
What if we have a huge number of functions depending on some properties? We don't need to touch the setter and getter as much as we can and let it do its job automatically. Therefore, we're going to separate the properties and their corresponding functions into a separate place.
First of all, let's define some terms that vue is using in order to better understand what we are building.
- The
updateTotalPricefunction is called an effect as it changes the state of the program. - The
priceandquantityproperties are called dependencies of theupdateTotalPriceeffect. As the effect is depending on them. - The
updateTotalPriceeffect is said to be a subscriber to its dependencies. i.e.updateTotalPriceis a subscriber to bothpriceandquantity
Now that we know the terms, we're going to create a Map called depsMap that maps each dependency to its corresponding list of effects that have to be run on changing the dependency.
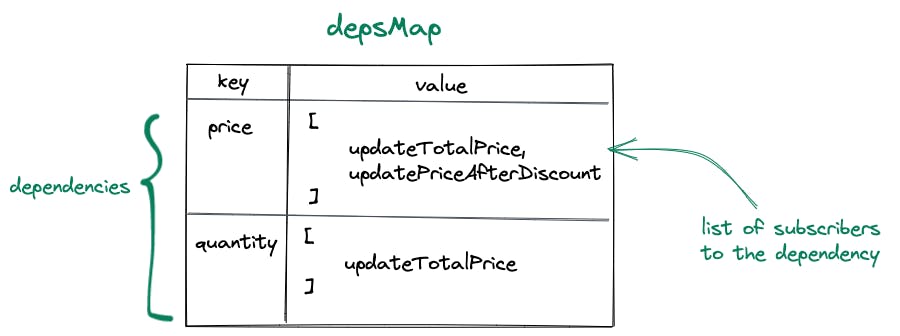
For example, In the previous image, we can see that the price property is a dependency for both updateTotalPrice and upadtePriceAfterDiscount effects. Whenever the price changes we need to rerun the list of effects.
Now we need to change the setter a little bit to benefit from the created depsMap. We're going to get the list of effects of a certain dependency and loop over them executing all of them at once.
let proxiedProduct = new Proxy(product, {
    get(target, property){
        // Let's keep the getter empty for now
    },

    set(target, property, value){
        let oldValue = target[property];
        target[property] = value;

        // Call update function only if the value changed
        if( oldValue != value ) {
            // Get list of effects of dependency
            let dep = depsMap.get(property)

            // Run all the effects of this dependency
            dep.forEach(effect => {
                effect()
            })
        }

        return true;
    }
})
Now, all we need to do is keep the depsMap updated with all the dependencies and all the effects that should run on changing a dependency.
So far this is working great until we have multiple reactive objects. If we took another look at the depsMap we can see that it contains the properties of the product object only. In reality, it's more complicated. We’re not dealing with only one object but with multiple objects and we need all of them to be reactive. Consider the case we have another object user and we want it to be reactive too. We will need to create a new depsMap for the user object other than that of product. To solve this issue, we’re going to introduce a new layer targetMap.
Improvement 3: Creating The targetMap
We’re going to build a depsMap for each reactive object. Now we need a way to map between the reactive object and its depsMap ( If I have the reactive object, how can I get to its depsMap ). So, we’re going to create a new map targetMap where the key is the reactive object itself and its value is the depsMap of that object
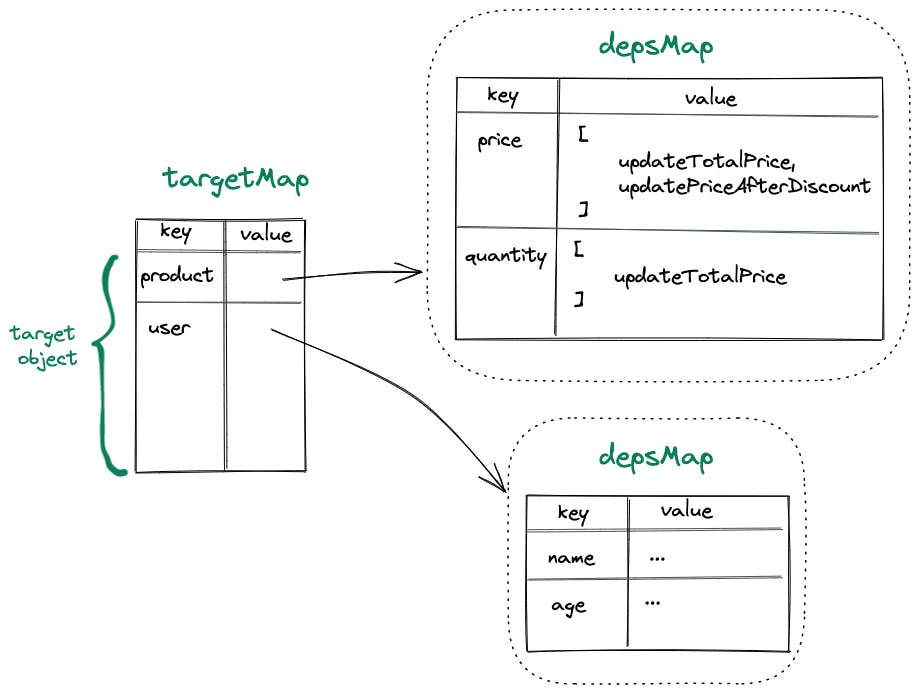
We need the key of the targetMap to be the reactive object itself and not just a string. For example, the key should be the product object itself and not the string ‘product’.
Therefore, we cannot use a regular map to build the targetMap instead, we’re going to use javascript WeakMap. WeakMaps are just key/value pairs (regular object) where the keys must be objects and the value could be any valid javascript type. For example:
const product = {price: 20, quantity: 5};
const wm = new WeakMap(),;
wm.set(product, "this is the value");

wm.get(product) // Returns "this is the value"
Now as we know how to build the targetMap. We need to update our setter too as now we’re dealing with multiple depsMaps and we need to get the correct depsMap. Since in the setter we can get the target object. We can use our targetMap to get our depsMap as following
let proxiedProduct = new Proxy(product, {
    get(target, property){
        // Let's keep the getter empty for now
    },

    set(target, property, value){
        let oldValue = target[property];
        target[property] = value;

        // Call update function only if the value changed
        if( oldValue != value ) {
            // We get the correct depsMap using the target (reactive object)
            let depsMap = targetMap.get(target)
            if(!depsMap) return

            // Get list of effects of dependency
            let dep = depsMap.get(property)
            if(!dep) return

            // Run all the effects of this dependency
            dep.forEach(effect => {
                effect()
            })
        }

        return true;
    }
})
Wrapping It All Up
So far, we've built only the setter function in the proxy. This function is the one responsible for triggering all the effects whenever a property changes. therefore, this function is called trigger by Vue.
Let's wrap all the improvements we have stated above to solve our main problem and we will add a new reactive variable priceAfterDiscount that's depending only on the price property
First, let's define our reactive variables and their corresponding effects
let product = { price: 20, quantity: 5 };
let totalPrice = product.price * product.quantity;
let priceAfterDiscount = product.price * 0.9;

// Effects
function updateTotalPrice() {
 totalPrice = product.price * product.quantity;
}

function updatePriceAfterDiscount() {
 priceAfterDiscount = product.price * 0.9;
}
Second, let's define and fill the
targetMapanddepMapconst targetMap = new WeakMap(); const productDepsMap = new Map(); targetMap.set(product, productDepsMap); productDepsMap.set('price', [updateTotalPrice, updatePriceAfterDiscount]); productDepsMap.set('quantity', [updateTotalPrice]);Finally, we need to create the proxy for the
productobject// Creating the Proxied Product let proxiedProduct = new Proxy(product, { get(target, property) { // Let's keep the getter empty for now }, set(target, property, value) { // ... same as we've defined it in the previous section }, });Voila, Our
productobject is now reactiveconsole.log(totalPrice); // Returns 100 console.log(priceAfterDiscount); // Returns 18 // totalPrice and priceAfterDiscount should be updated on updating price proxiedProduct.price = 30; console.log('✅ After Updating Price'); console.log(totalPrice); // Returns 150 console.log(priceAfterDiscount); // Returns 27 // only totalPrice should be updated on updating quantity proxiedProduct.quantity = 10; console.log('✅ After Updating Quantity'); console.log(totalPrice); // Returns 300 console.log(priceAfterDiscount); // Still Returns 27
Next Steps
So far we have partially solved our problem, At first we needed a way to say to javascript "Hey, totalPrice is depending on price and quantity. Whenever any of them changes recompute the totalPrice" and that's what we've achieved in the end. The product object is now reactive.
The only problem so far is that we're filling the values of depsMap and targetMap manually and we have to maintain them. We need a way for those maps to be filled and maintained automatically without our intervention.
In the next part of this series we're going to continue building on this to have a complete reactive engine that's completely automated without any intervention from us. Stay tuned.
