Web Speech API: How Google Translate Converts Speech to Text

Frontend engineer @Instabug. Passionate about building digital products with 4+ years of experience providing high-impact web solutions.
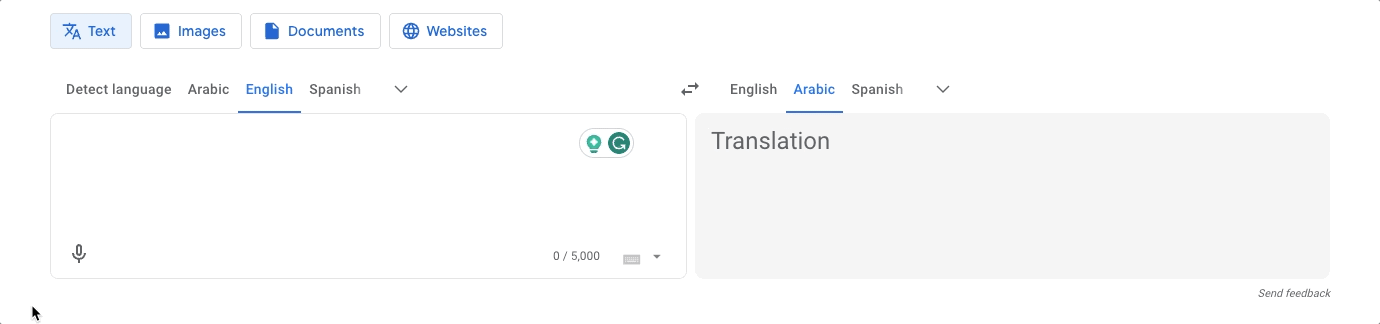
All of us have faced times when we needed to use Google Translate. It's a simple but strong tool that helps when there's a language barrier causing confusion between people.
Imagine being in a foreign country and not understanding what's being spoken. Without knowing their language, you can't even write down the words to translate. This is where a helpful feature comes in: speech recognition. We can let Google Translate listen to what we don't get, and it turns it into writing that can be translated. This is one of its most practical and essential features.
But, how does Google Translate manage to recognize your speech? Thanks to the Web Speech API which makes all of this possible!
Introducing Web Speech API
The Web Speech API lets us work with voice in our web apps. It's made up of two main parts:
SpeechSynthesis: This lets your app read out text, turning words into speech.SpeechRecognition: This does the opposite, turning spoken words into text that your app can understand.
In this article, we'll mainly talk about how SpeechRecognition works. We'll cover what it does, how it does it, what information it can understand, and the different things that happen when it's working. We'll save the SpeechSynthesis part for another article in the future.
Getting Started With Speech Recognition
To begin, we'll use a simple example that we'll build upon. We'll start with a basic button labeled "Translate By Voice." When you click the button, we'll listen to what you say and show it in the console. As we move forward, we'll add more to this.
<button id="micBtn">Translate By Voice</button>
To begin, we have to make a new SpeechRecognition instance. Depending on your browser, it might be called webkitSpeechRecognition. It's smart to check if either SpeechRecognition or webkitSpeechRecognition exists before we start.
Once we have our instance, we just wait for you to click the button. When you do so, we use the "start" method on our SpeechRecognition instance. This opens the microphone, listens to your speech, and fires a result event when it understands what you're saying.
We're also going to listen to the result event. Once it is fired, we're going to log this event in our console.
const SpeechRecognition = window.SpeechRecognition || window.webkitSpeechRecognition;
const recognition = new SpeechRecognition();

const micBtn = document.querySelector("#micBtn");
micBtn .addEventListener("click", () => {
    recognition.start();
});

recognition.addEventListener('result', (e) => {
    console.log(e);
})
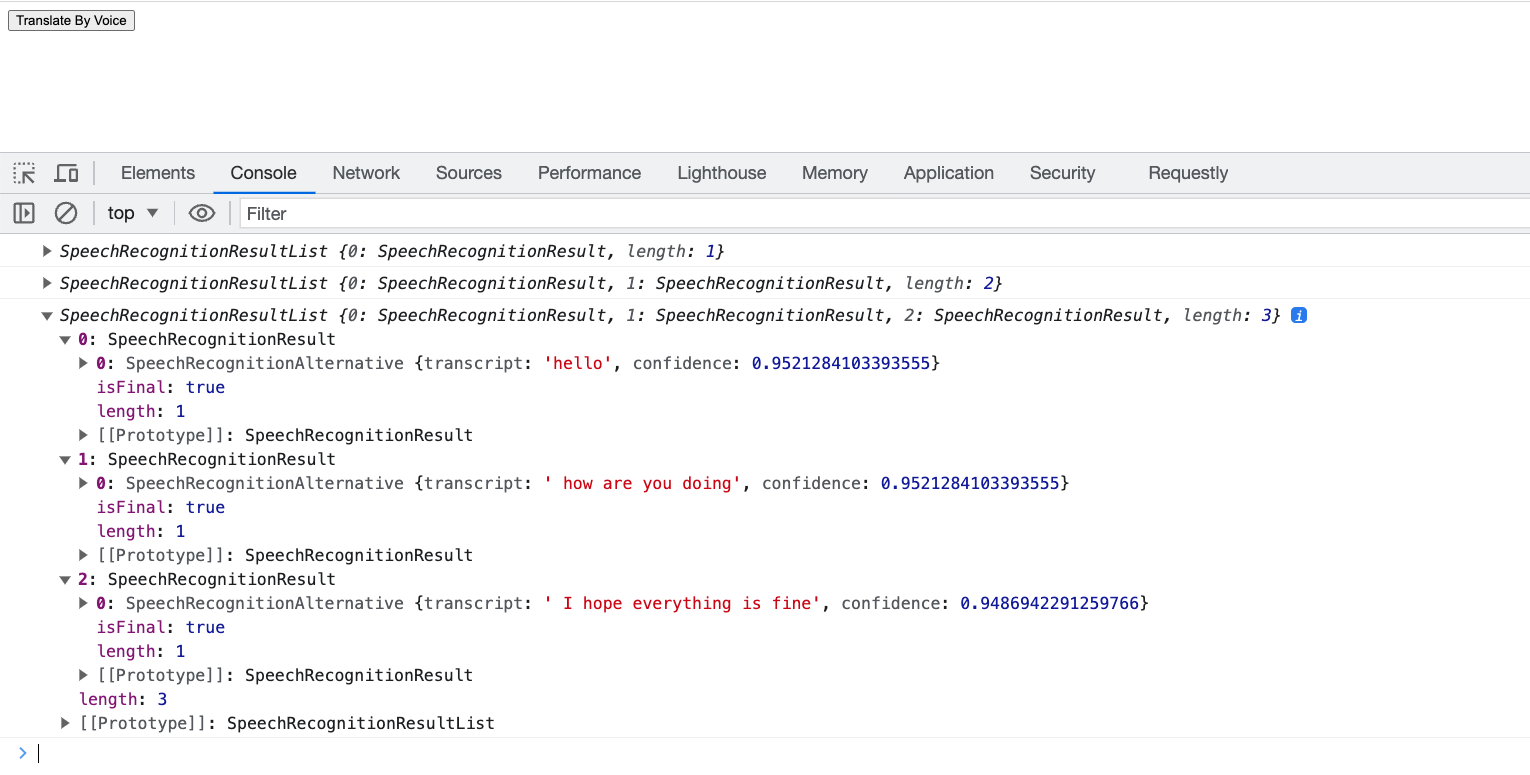
When we test our code, we notice that the browser listens to our words. When we're done talking, an event is logged to our console. This event has lots of info, but the most important part is the results. This is where the words we spoke are stored as text.
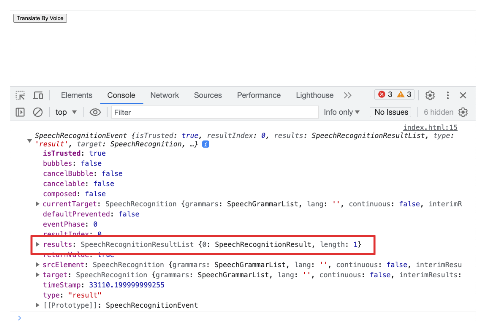
To see how we get the words we said from the logged event, let's look at the "results" part in the event details.
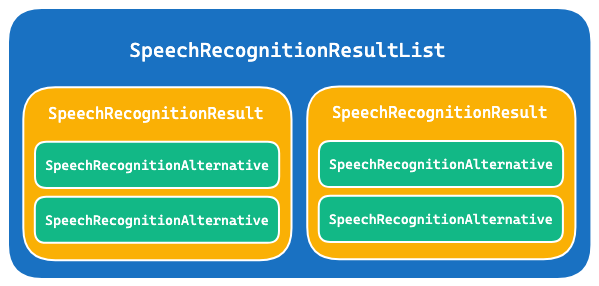
results: It's just aSpeechRecognitionResultListobject.SpeechRecognitionResultList: Think of it as a collection ofSpeechRecognitionResults.SpeechRecognitionResult: Each of these represents a recognition match for what you said. It holds one or moreSpeechRecognitionAlternatives.SpeechRecognitionAlternative: These are the actual words that the speech recognition service picked up.
If this seems a bit confusing, no need to stress. It's completely fine. In many situations, we don't have to grasp these objects in detail. With more examples, things will become much clearer and easier to understand.
By default, we just have one SpeechRecognitionResult and one SpeechRecognitionAlternative. This is why we can directly get the recognized words using e.results[0][0].
So, if we change our code to log e.results[0][0], we'll directly see the words in the console.
const SpeechRecognition = window.SpeechRecognition || window.webkitSpeechRecognition;
const recognition = new SpeechRecognition();

const micBtn = document.querySelector("#micBtn");
micBtn .addEventListener("click", () => {
    recognition.start();
});

recognition.addEventListener('result', (e) => {
    console.log(e.results[0][0]);
})
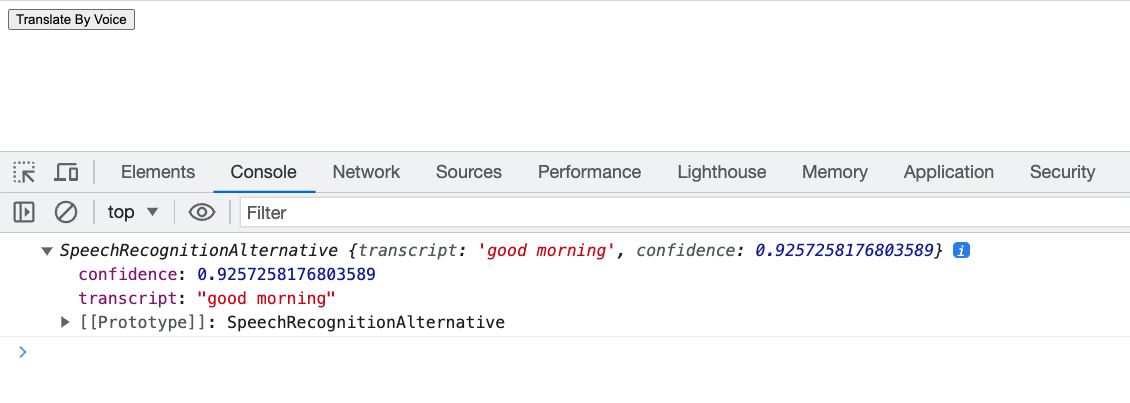
Giving our modified code a try, by clicking the button, the browser listens to your words. After you're done talking, what the browser understands will show up in the console. In our example, the browser recognized that we've said "good morning" with a confidence level of 92.5%.
Keep Listening Forever
In our previous example, you probably noticed that the browser keeps listening as long as you're talking and then stops when you're done. It recognizes what you said and doesn't listen again.
But sometimes, we want the browser to keep listening and tell us each time it understands what we're saying. We can do this using the continuous property in our SpeechRecognition instance.
If
continuousisfalse, the recognition would stop after you finish speaking, and you would need to click the button again to start listening for the next input.If
continuousistrue, you could say a sentence, pause, and then continue talking without clicking any buttons in between.
If we took a look on Google Translate, we'd notice that they are setting the continous property to true. as it keeps listening to whatever the user is saying until the user clicks on the stop button.
Listening To Partial Results
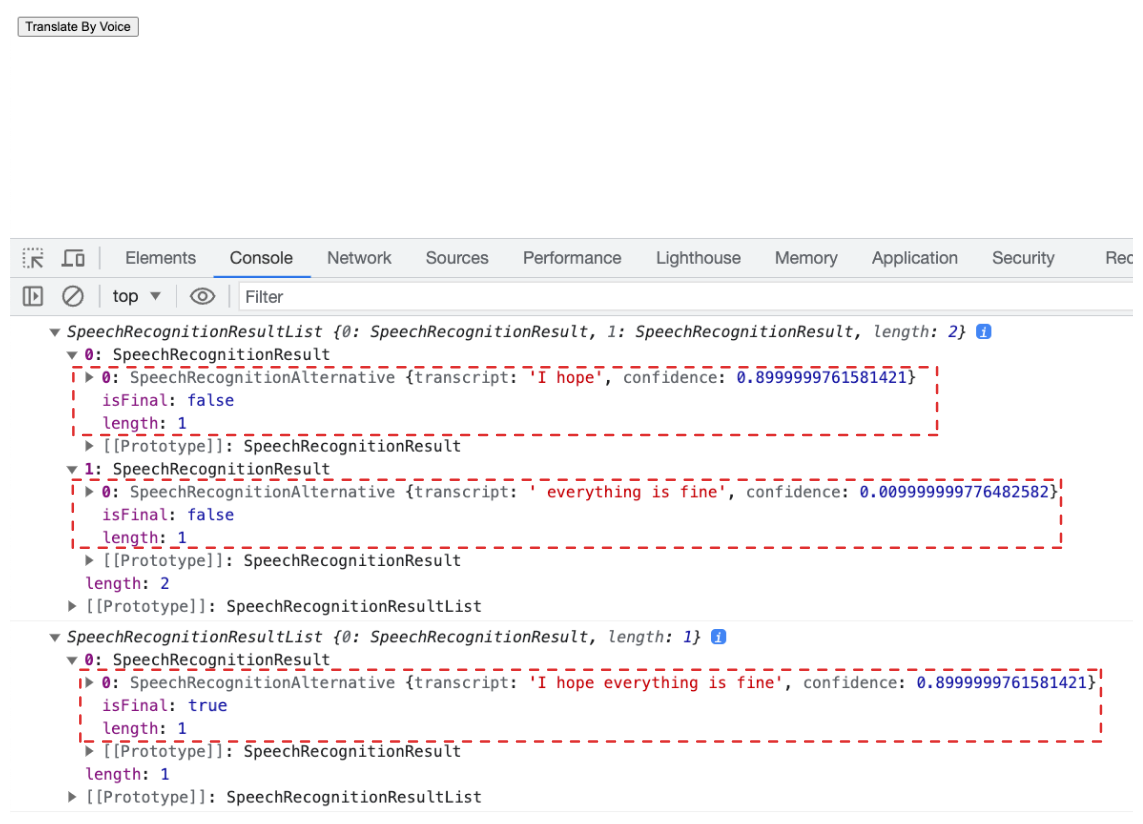
In our earlier examples, the Web Speech API gave us the recognized speech result after the user completed speaking a whole sentence. Even when we set the continuous property to true, it allowed us to listen to multiple sentences, but we still had to wait for the user to finish an entire sentence to get the recognition results.
For instance, in our previous example with continuous set to true, the user said: "hello," then "how are you doing," and finally "I hope everything is fine." In each case, we had to wait for the user to finish the entire sentence to receive the recognition result. We didn't get individual words like "I hope," "everything," and "is fine" separately; instead, we waited until the whole sentence "I hope everything is fine" was completed, and then we received the result.

There's a handy property called isFinal that is returned with the result. This property tells us whether the result is the end of a sentence or just part of a sentence. So, we can use isFinal to distinguish between completed sentences and ongoing speech recognition. As shown in the previous example, isFinal was always set to true because all of the results were ends of sentences.
If we want to detect words as soon as they're recognized, without waiting for the full sentence to finish, we can set the interimResults property to true. This makes the result event trigger as words are recognized, even if the whole sentence isn't done yet.
const SpeechRecognition = window.SpeechRecognition || window.webkitSpeechRecognition;
const recognition = new SpeechRecognition();
recognition.interimResults = true;

const micBtn = document.querySelector("#micBtn");
micBtn .addEventListener("click", () => {
    recognition.start();
});

recognition.addEventListener('result', (e) => {
    console.log(e.results[0][0]);
})
In the example below, parts of the sentence like "I hope" and "everything is fine" are sent separately. The isFinal property is set to false, showing that these parts are not complete sentences yet.
Setting Recognition Language
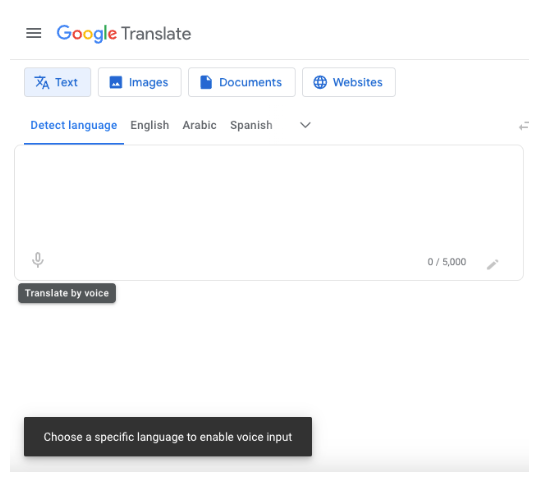
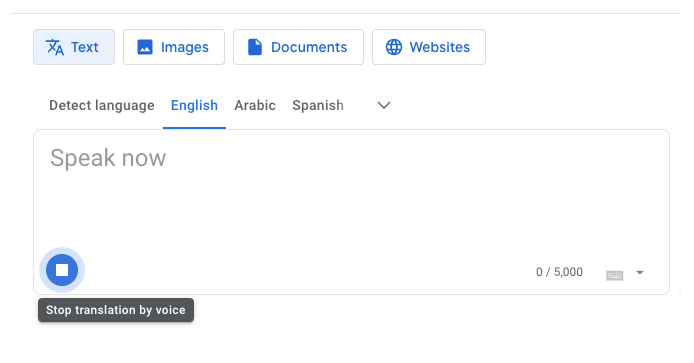
If you try to use Google Translate's "Translate by voice" feature and select "Detect language" as the language option, you'll see an error message pop up. It will tell you that you need to pick a specific language to use voice input.
The reason for this is that the Web API can't automatically figure out the language of the speech you're speaking. It needs to know which language it should be listening to. That's why the SpeechRecognition instance has a property called lang. This lang property is used to tell the system which language to expect. Which is used to get or set the language of the recognition process. This property accepts any valid BCP 47 Language Tags like "en-US" or "ar-SA". By default, if we didn't pass any value for this property, it falls back to the HTML "lang" attribute value. If that's not there, it falls back to the default language of the user's browser, which you can find with navigator.language.
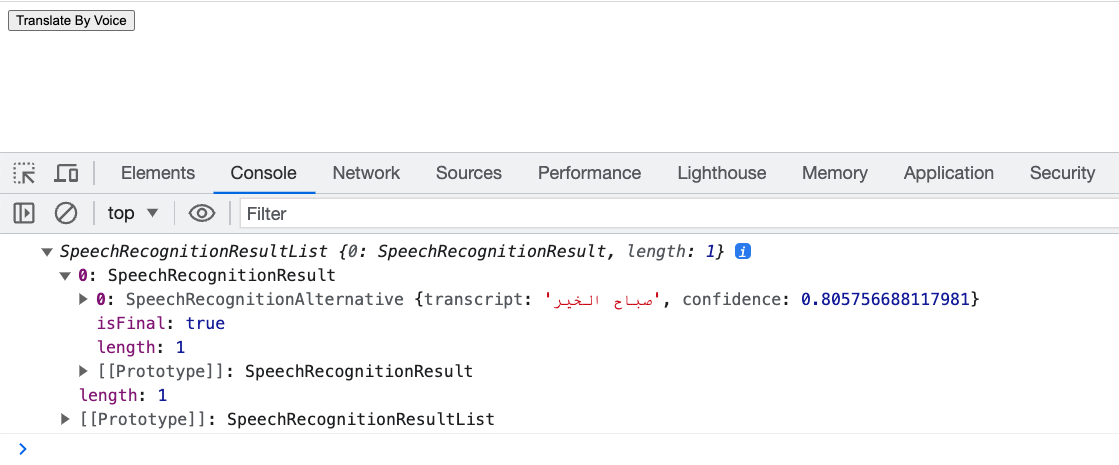
So, to recognize Arabic speech, for example, you'd set "lang" to "ar-SA" when the user selects the "Arabic" language.
So, following along with what we have built so far, if we'd like to recognize Arabic if a user selects the "Arabic" language. We simply need to tell it to do so by setting "ar-SA" as the value for the lang property.
const SpeechRecognition = window.SpeechRecognition || window.webkitSpeechRecognition;
const recognition = new SpeechRecognition();
if(selectedLang === 'Arabic') recognition.lang = 'ar-SA';

const micBtn = document.querySelector("#micBtn");
micBtn .addEventListener("click", () => {
    recognition.start();
});

recognition.addEventListener('result', (e) => {
    console.log(e.results[0][0]);
})
And we can see, it works! and detected "صباح الخير" in Arabic.
Stopping Speech Recognition
What if we want a button that lets the user stop the speech recognition and listening process? We can do this using the stop method on our SpeechRecognition instance. When we use this method, it tries to provide a result with what it has heard up to that point.
Using this method is easy, as demonstrated in the example below.
const stopBtn = document.querySelector("#stopBtn");
stopBtn .addEventListener("click", () => {
    recognition.stop(); // Just this line
});
We have another method abort which can be used for the same purpose. The only difference between abort and stop is that stop ends the recognition process gracefully and tries to return a result with what it has heard. However, the abort method forces the process to stop instantly without returning any results.
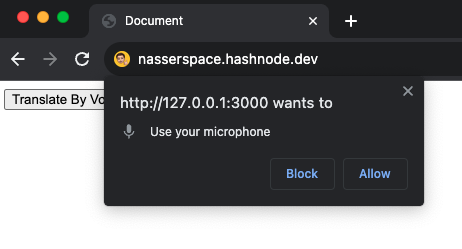
Asking For User's Permission
Of course, the browser will not allow you to access the user's mic without his permission. That's why a popup appears to the user requesting his permission to access the mic. But, don't worry. This popup shows only the first time using the API. Once the user granted permission for us to access his mic. The browser will not be asking for permission again.
Browser Compatibility
Supported: Chrome, Safari, Microsoft Edge, Opera, Brave, Arc, and other Chromium-based browsers.
Not Supported (yet): Firefox.
That's why if we try to use the "Translate by voice" feature of Firefox, we'll get a popup saying that it isn't supported in this browser.

Opening Doors to Innovation 💡
Building Google Translate with the Web Speech API is awesome, but there's so much more we can do with this powerful API! Here are some cool examples:
Language Learning Apps: We can make apps that help users learn a new language. The app listens to what they say and tells them if they're speaking correctly!
Voice Note-Taking App: Imagine an app where you can quickly save your thoughts without typing. You just speak your idea, and it's saved as text (or even audio if you like).
Accessibility Tools: We can build features for people with disabilities. For example, they could navigate through different parts of an app or perform actions using their voice.
The possibilities are limitless! Get creative with the API and start creating amazing apps.


